 fyllyo
Turn your own fillable PDF into a reusable AI template
When the form you use every week is not in the library, start with its blank fillable PDF. Describe what the fields mean once, then use the prepared template with each client’s own documents.
Start with fields you can type into
Follow along in Fyllyo on an Apple silicon Mac, M1 or later. Install the app and complete its local-model setup before filling. You can use the desktop trial or a license; custom-template setup is paid separately with account credits or your optional provider API key.
Fyllyo custom setup needs a blank fillable PDF: a form with interactive fields, not only a picture of a page. Open your blank in a PDF viewer and check that you can click into its fields and enter text.
A scanned document can be supporting evidence for a fill without being a suitable blank output form. If your blank is flat or scanned, first obtain or prepare a fillable version with an appropriate PDF tool. This tutorial starts after that step.
Before creating a custom template, check the built-in library. An existing built-in form is ready to fill and does not need this custom setup.
Keep setup files separate from client files
The blank form and its field rules are the setup materials. Each fictional client has a profile and a project request, which you add later during local filling.
All names, companies, addresses and contact details in this pack are fictional. Use the files for learning before bringing your own appropriately prepared documents into the workflow.
Tell Fyllyo whose information belongs in each field
Useful instructions define roles, sources and formats. “Fill the form accurately” leaves the important decisions unstated: which person, which company, which date, and what to do when the documents do not say.
| Fields | What the rule resolves |
|---|---|
| Contact name and company | Use the client contact and company identified in the profile, not the service provider or another person named elsewhere. |
| Email, phone and mailing address | Use the profile’s documented values. Leave the phone blank when the source does not provide one. |
| Project and requested start date | Use the project request. Format a stated date as MM/DD/YYYY; leave it blank when unspecified. |
| Budget | Copy the stated USD budget as digits without a dollar sign or thousands separators. Do not infer it from other amounts. |
| Email/phone preference checkboxes | Select only an explicitly stated preference. Having an email address does not prove that email is preferred. |
The attached rules describe the blank form, without embedding a client’s personal details. For your own form, use its own field names, roles and requirements rather than copying rules that do not apply.
The setup note
The app also has an optional “About this form” note. This example uses:
Fictional client project intake. Each fill receives one client-profile PDF and one project-request PDF. Use the client’s company and contact, not the service provider. Follow the attached field rules; leave undocumented values blank. This is a reusable training example, not a government form.
Create the reusable template
In Fyllyo, choose Add your own form. Select the blank client-intake PDF, attach the form-instructions PDF and add the setup note. Check those files before choosing Set up this form.
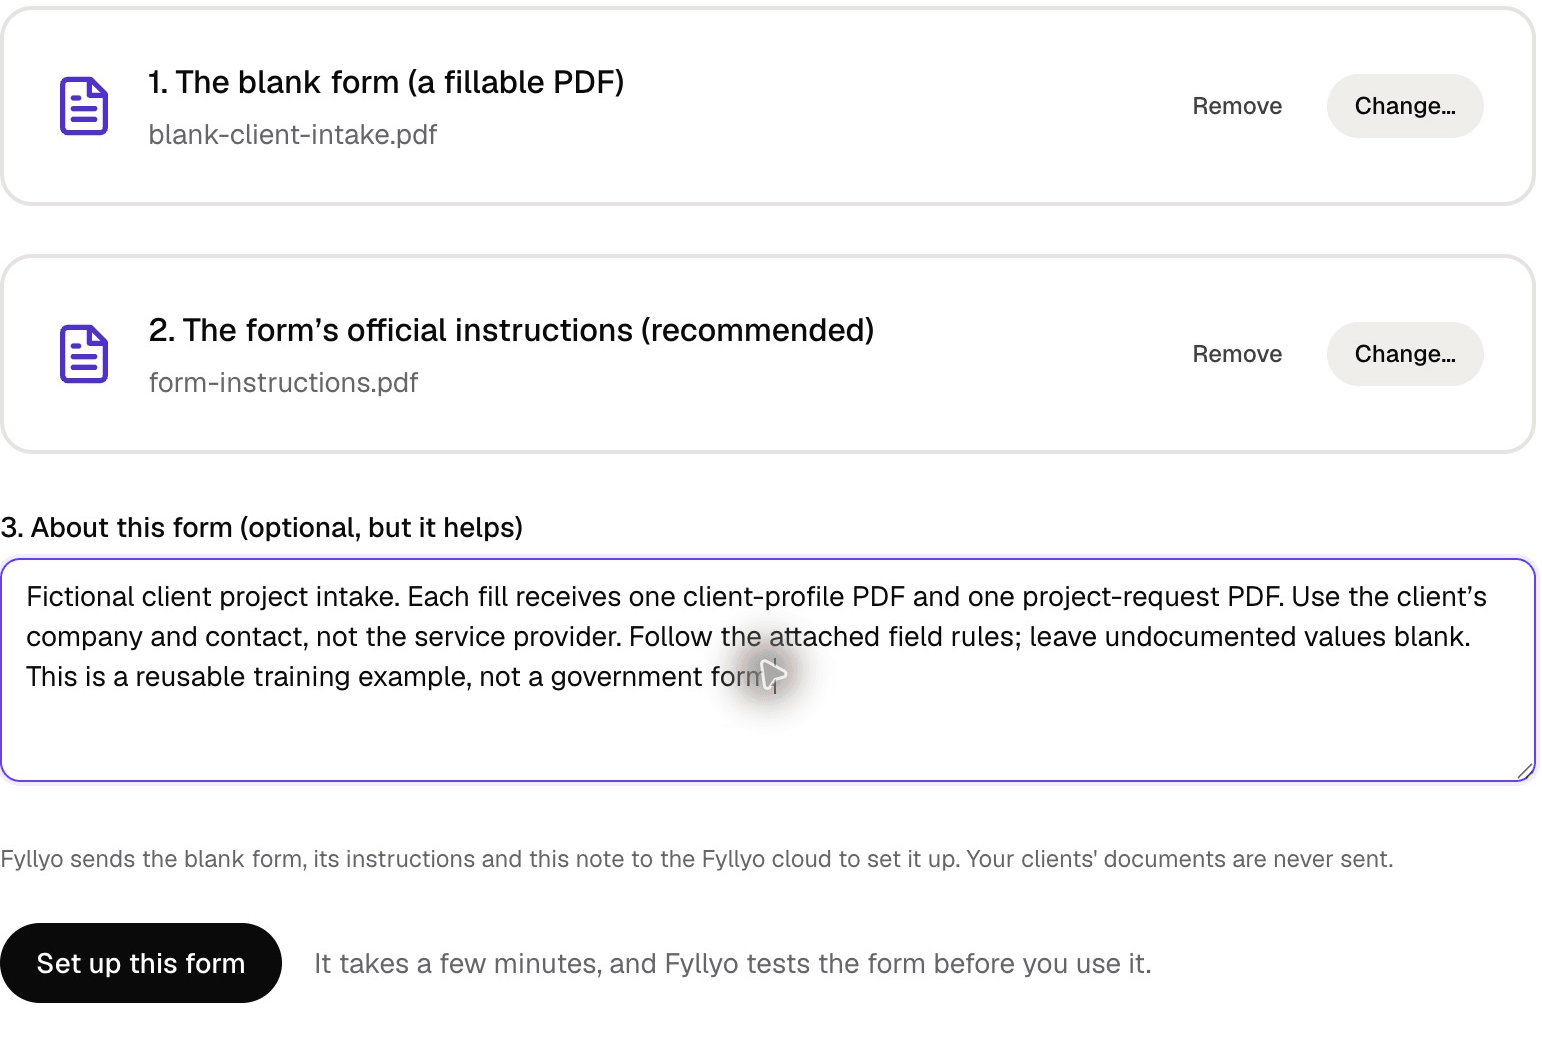
Fyllyo sends the blank, attached instructions and setup note to Fyllyo Cloud when you use account credits, or to your chosen provider when using an API key. Keep client details out of all three.
Custom setup is paid separately from the desktop license. You do not need your own API key for the Fyllyo-credit route. The app shows setup progress while it prepares and tests the form; wait for a successful result before using the template. See the current setup-credit terms.
Our completed setup created a template named Client project intake. We used that one template for both local fills below.
Fill client A, then inspect the missing fact
Select the prepared intake template and add only client A’s profile and project-request PDFs. Start the local fill, then compare the answers with the source lines in the review screen.
Maya Chen’s profile identifies Northlight Studio, her mailing address and email. The request names the Website refresh project, a November 2, 2026 start date, a USD 4,800 budget and email preference. No phone number is supplied.
| Field | Source-backed answer |
|---|---|
| Client contact / company | Maya Chen / Northlight Studio |
| maya@example.com | |
| Phone | Leave blank: not provided |
| Requested start date | 11/02/2026 |
| Budget | 4800 |
| Contact preference | Email selected; Phone unchecked |
In our October 14, 2026 run, Fyllyo filled the documented values, selected Email and left the unsupported phone blank. We checked all ten fields against the sources and saved the PDF without editing the result. This small fictional example demonstrates the workflow; it is not a general accuracy benchmark.
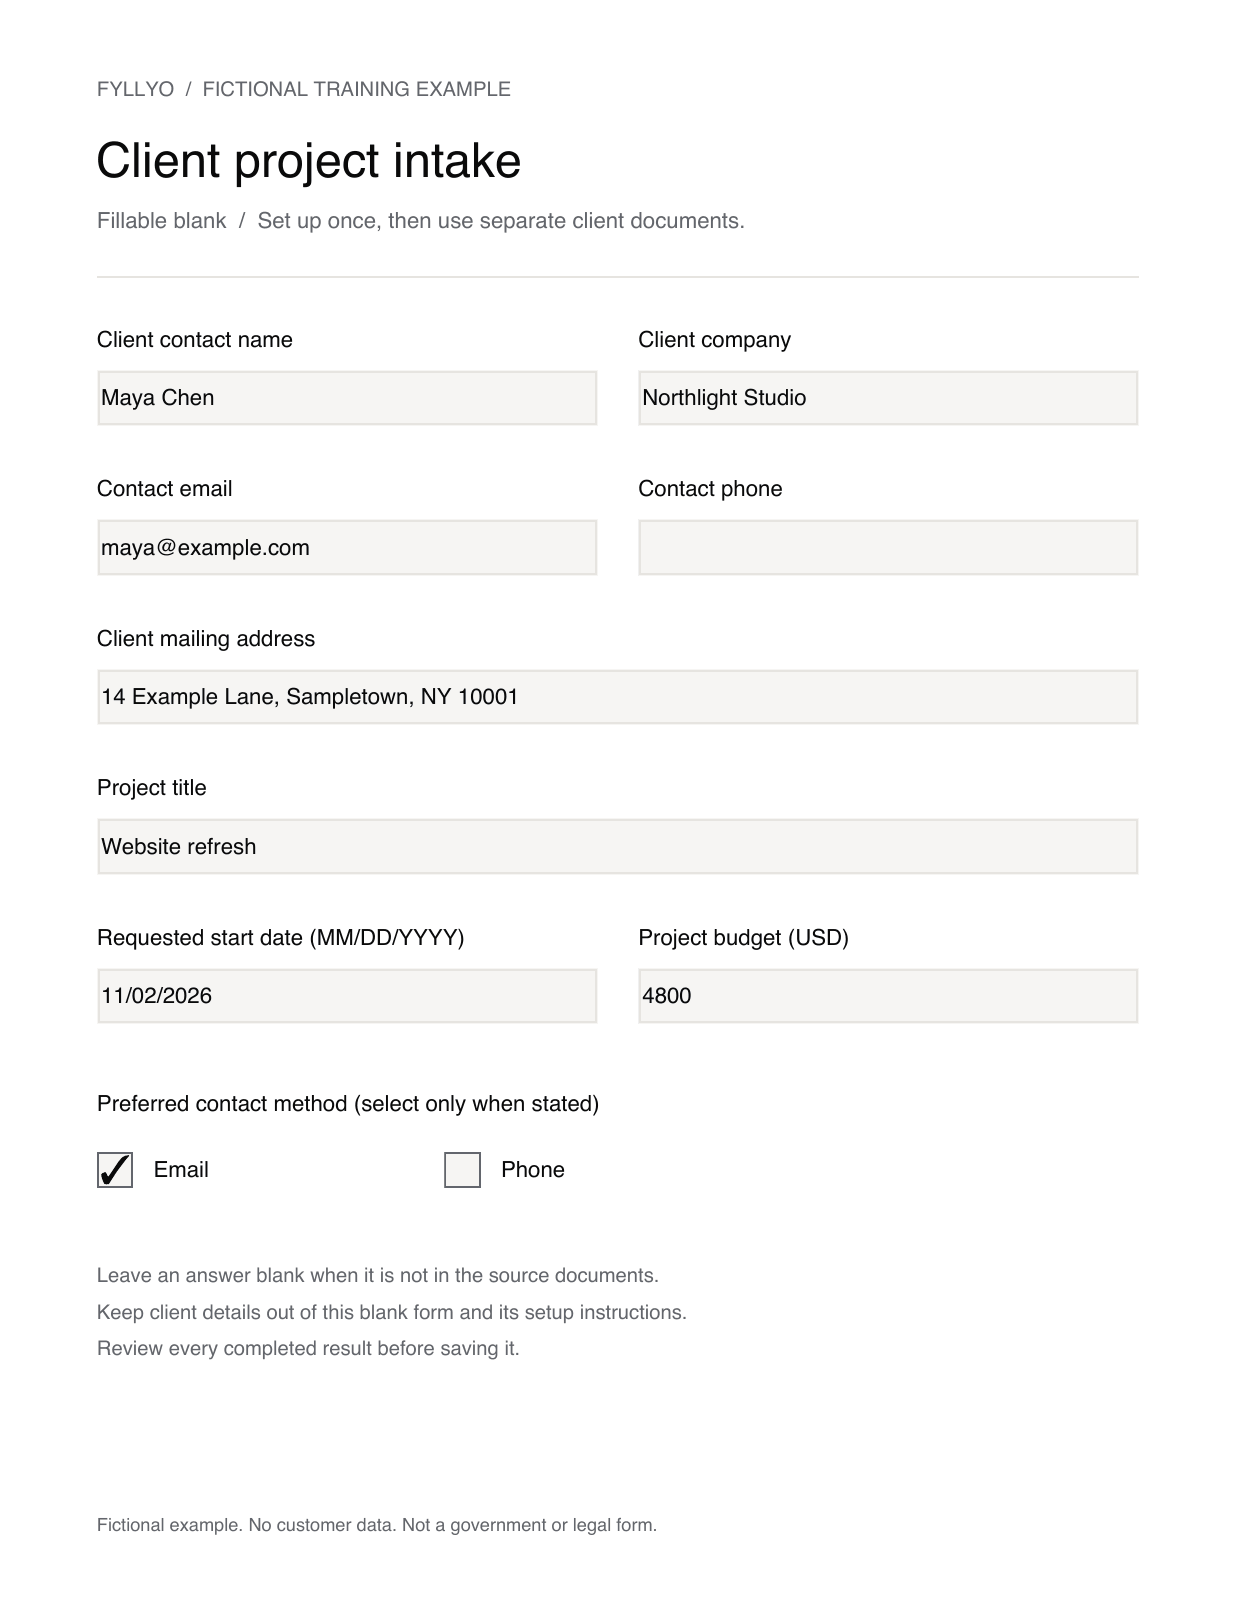
Inspect the mailing address and project title too. If an answer is wrong, correct it in the review screen before saving. A blank unsupported phone number is preferable to a plausible one that the client never provided.
Use the same template with client B’s documents
Begin a separate fill with the same prepared intake template. Add client B’s profile and project request, without client A’s files. Template reuse saves repeating the setup; it does not mean combining two clients’ documents into one run.
Jordan Ellis’s documents identify Maple Workshop, the Product photography project, a USD 2,600 budget, a phone number and phone preference. The request explicitly leaves the start date unspecified.
| Check | Client A | Client B |
|---|---|---|
| Client contact | Maya Chen | Jordan Ellis |
| Client company | Northlight Studio | Maple Workshop |
| Phone | Blank: not provided | 202-555-0146 |
| Requested start | 11/02/2026 | Blank: unspecified |
| Project budget | 4800 | 2600 |
| Preferred contact | Phone |
The second local run used the same prepared template without another setup job. We checked B’s saved result against all ten fields: Jordan Ellis and Maple Workshop replaced A’s details, Phone was selected, and the unspecified start date remained blank. No manual corrections were made.
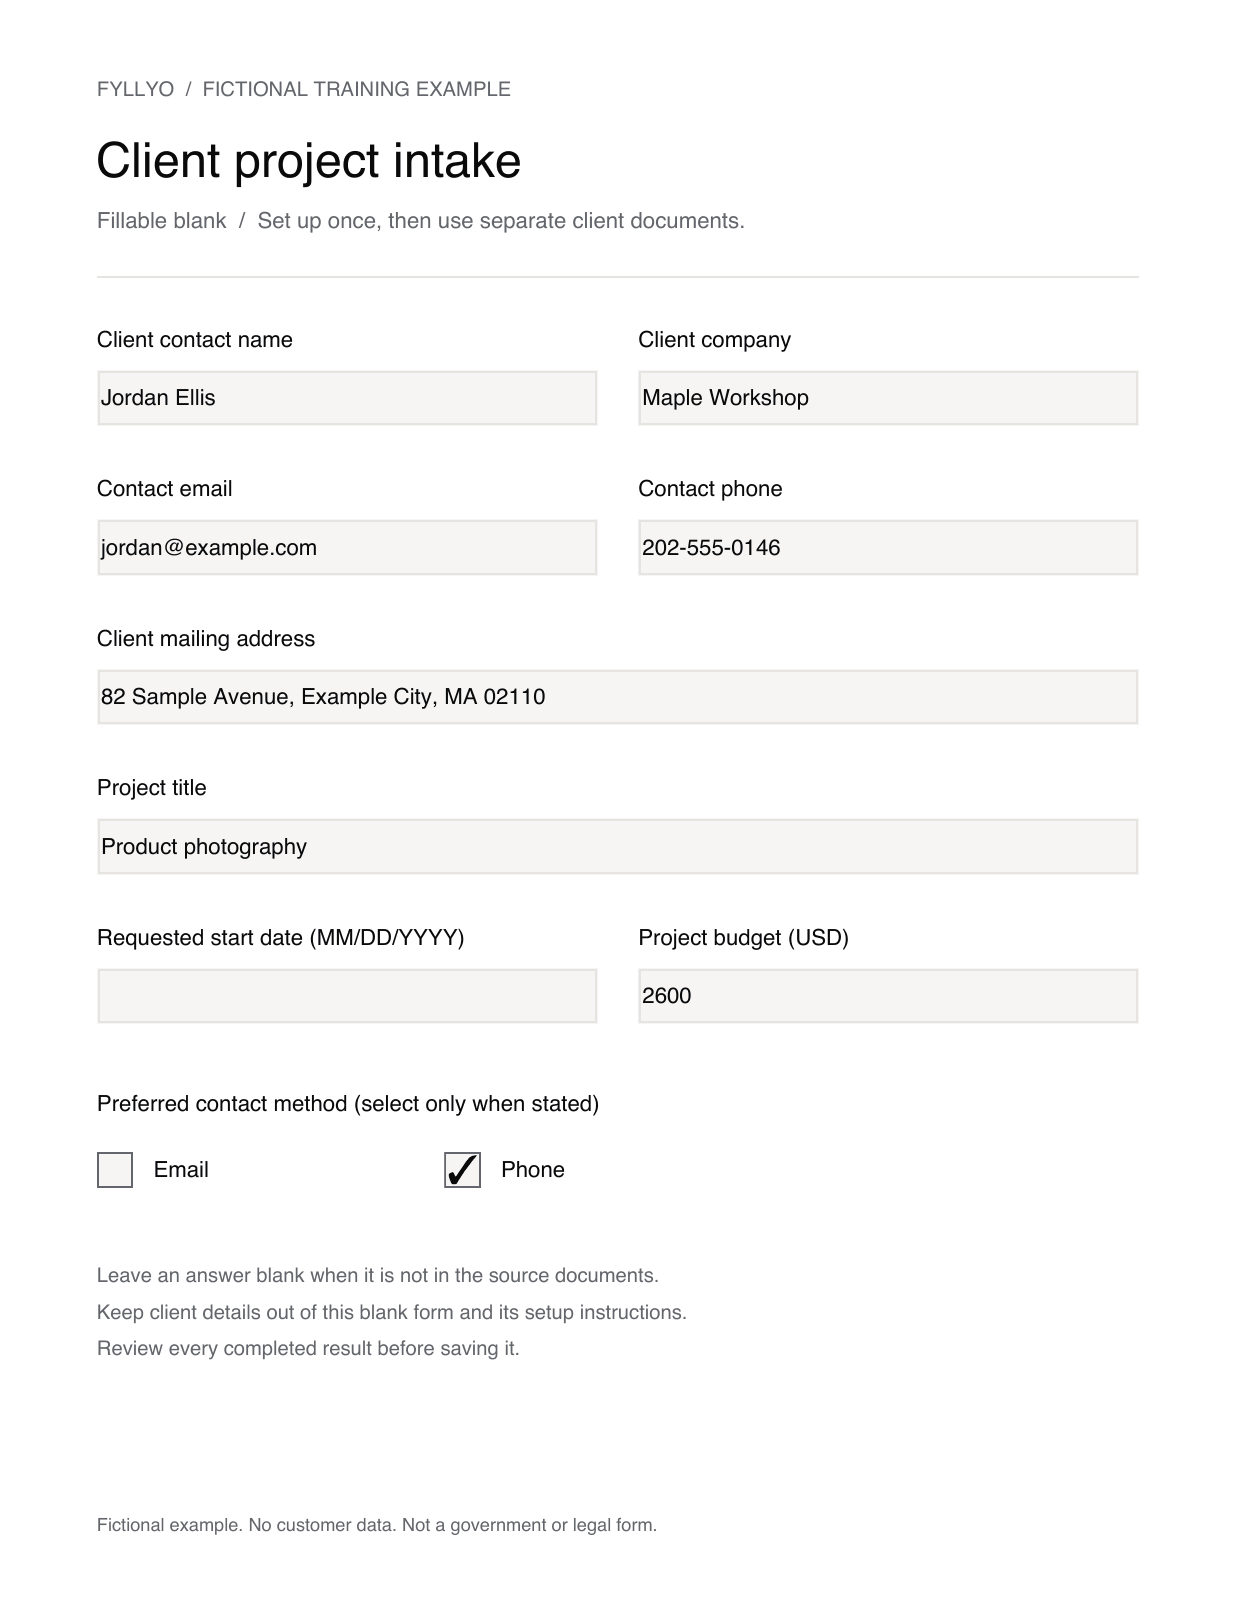
Confirm every value belongs to B’s documents, including the email and address. Review and save B’s PDF separately. Once configured, local filling uses no AI credits; custom setup and filling are different stages.
When your result differs, check the cause
Start with the source and the field rule. A missing document, an unclear instruction and a wrong value in the PDF need different responses.
| What you see | What to check | Next step |
|---|---|---|
| Cannot type into the blank | Whether the PDF has real interactive fields. | Obtain or prepare a fillable blank before custom setup. |
| A missing answer | Whether the selected client’s documents state the fact clearly. | Leave it blank until the fact is provided; do not invent it to complete the example. |
| Wrong person or company | Whether the instructions define the field’s role and the files belong to the intended client. | Correct the current result; report a recurring template problem with its name and field, without client details. |
| Wrong date, budget format or checkbox | Whether the field rules state the format and the source actually states the choice. | Compare the source, correct the value and inspect the saved PDF. |
| Setup did not finish | The error shown by the app and whether setup produced a usable template. | Use the app’s supported recovery or contact support. Do not assume every retry or regeneration has the same charge. |
Fyllyo’s Help page explains result corrections and the support route. A corrected filled value and a changed reusable template are different things; do not assume editing one result retrains the template.
Apply the method to your own recurring form
Use a qualifying blank, describe roles and formats, and review the first few completed forms carefully. The reusable part is the form’s rules; the client’s evidence belongs to each separate fill.
- Check that the form is not already built in.
- Keep the blank and setup instructions free of client details.
- Explain sources, person roles, expected formats and missing facts.
- Try representative client documents and inspect key fields.
- Open the saved PDF and confirm the edits and checkboxes are where you expect them.
For the full capability and cloud boundary, see custom-form setup. For the ownership and usage distinction, see the cost guide.